Installing a Gravel Patio Doesn’t Have to Be Hard, Follow This Simple Step-by-Step Guide to Build a Beautiful Backyard in Just One Weekend
Gravel patios need more than just rocks scattered across dirt. Charlotte homeowners face unique challenges – scorching summers and soggy winters demand proper installation.
The foundation matters most. Excavate 4-6 inches, add landscape fabric (prevents weeds), then layer crushed stone before the decorative gravel. Local quarries offer stones that won’t fade in Carolina sun.
Edge containment prevents migration during downpours. Maintenance? Minimal – occasional raking and weed checks.
For about $3-5 per square foot, you’ll create an outdoor space that handles Charlotte’s climate swings beautifully. Keep reading for material specifics and drainage solutions perfect for Piedmont clay soil.
Key Takeaway
- A solid sub-base and secure edging are essential for a gravel patio’s stability and longevity.
- Choosing the right gravel size and depth ensures comfort and prevents shifting.
- Regular maintenance like raking and replenishing gravel keeps the patio functional and attractive.
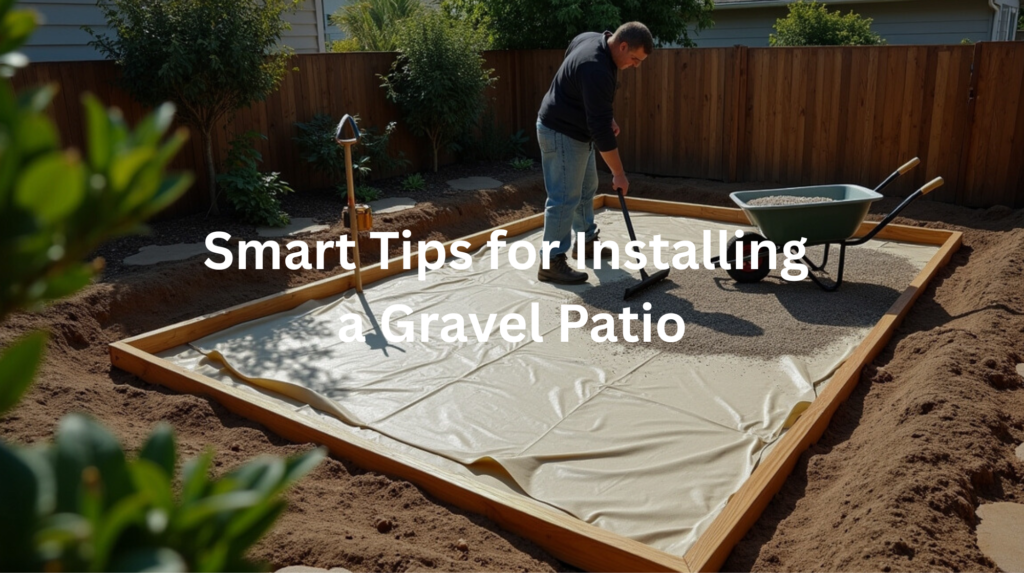
Building the Patio Base and Edging
Installing Edging for Gravel Containment
Setting up the edging comes first when tackling a gravel patio project. Without proper containment, gravel migrates everywhere. Into grass, flower beds, even inside the house. The wandering stones create maintenance headaches nobody wants to deal with month after month.(1)
Choose from Timber, Bricks, Stone, Concrete Blocks, or Metal Strips
The choice of edging material depends on your patio’s style and budget. Timber offers a rustic look but may degrade faster in Charlotte’s humid climate. Bricks and stone provide a classic, sturdy border that can last decades. Concrete blocks are practical and easy to install, while metal strips offer a sleek, modern edge that resists weathering.
Secure Edging Firmly with Stakes or Rebar, Ensuring Level Placement
Whatever material ends up in your cart, anchor it like you mean it. Drive stakes every 2-3 feet behind the edging. This prevents shifting when 200 pounds of gravel pushes against it. Check everything with a level. Twice. Uneven edges stick out like a sore thumb once the project’s done.
Laying a Stable Sub-Base Layer
The sub-base does the real work. It’s the unsung hero that prevents your gravel from turning into a rutted mess after the first rain.
Spread and Compact a 4-Inch Layer of Crushed Stone or MOT Type 1
Four inches of crushed stone creates the foundation. MOT Type 1, that’s crushed limestone mixed with smaller particles, locks together better than most alternatives. The varying sizes fill gaps between larger pieces, creating a surface that doesn’t shift under pressure.
Use a Hand Tamper or Plate Compactor for Thorough Compaction
Don’t skimp on compaction. A hand tamper works for tiny patios under 50 square feet, but anything bigger demands a plate compactor. Make multiple passes in different directions. The base should feel almost like concrete when you’re done. That solid. Skip this step and you’ll be raking sunken gravel back into place forever.
Weed-Resistant Membrane Installation
Nothing ruins a gravel patio faster than weeds poking through. Persistent. Ugly. Nearly impossible to remove once established.
Lay Landscape Fabric Over the Sub-Base to Inhibit Weed Growth
Good landscape fabric (minimum 3 oz weight) creates a physical barrier that most weeds can’t penetrate. It also keeps your gravel clean by preventing soil mixing from below, which would eventually turn your crisp stone into mud caked chunks.
Overlap Seams and Secure Fabric with Pins or Staples to Maintain Position
Overlap seams by at least 6 inches. Weeds find gaps like water finds holes in a roof. Use U shaped landscape pins every foot or so along edges and seams. The fabric should lie completely flat. Any wrinkles or bunching will show through the finished surface and probably drive you crazy every time you look at your otherwise perfect patio.
Adding and Finishing the Gravel Surface
Credits : Stone Warehouse
Choosing Suitable Gravel Type and Size
Not all gravel is created equal. The type and size you select determines comfort, appearance, and longevity of your patio space. This choice might seem minor. It affects everything that follows.
Opt for Decorative or Pea Gravel Sized 10 to 20 mm for Comfort and Stability
Pea gravel stands out among landscaping materials. Those smooth, rounded stones measuring 10 to 20 millimeters across have earned their popularity in patio construction. They compact well under pressure and don’t torture bare feet like sharper alternatives might. Decorative gravel offers something different – a spectrum of colors and textures that can transform a backyard from forgettable to distinctive.(2)
Spreading and Leveling Gravel
With base preparation complete and fabric carefully positioned, the project finally shows visible progress. The main event begins. Adding the gravel layer transforms hours of invisible labor into something tangible.
Distribute Gravel Evenly to a Depth of 2 to 3 Inches
Consistency matters here. A uniform layer about 2 to 3 inches deep across the entire area creates the foundation for success. This specific thickness strikes the necessary balance. Too thin a layer might expose the fabric underneath, especially after those notorious Carolina downpours wash away the top layer. Too thick and the surface becomes treacherous, particularly for guests wearing dress shoes or anyone with mobility issues.
For context, a typical Charlotte patio (around 200 square feet) generally requires about 1.5 cubic yards of gravel. Order extra. Always. Materials vanish faster than expected, and nothing kills momentum like running short with half a project baking under the August sun. Seriously.
The distribution process requires patience. Some homeowners might feel tempted to dump and spread quickly, but careful attention to depth variations will prevent future headaches. Worth it.
Use a Rake to Create a Smooth, Uniform Surface Avoiding Excessive Depth
Raking distributes the gravel evenly, eliminating low spots where water might collect after those sudden afternoon thunderstorms. The process looks straightforward but requires attention to detail. Work from the edges inward, using long, even strokes. Most people rush this part. Don’t.
Final Touches to Enhance Durability and Aesthetics
Lightly Water Gravel to Settle Dust and Help Compaction
A gentle spray from your garden hose helps settle dust and encourages the stones to find their natural position. This reduces loose pieces and prevents that annoying dust cloud when guests walk across. In Charlotte’s humidity, this step might seem unnecessary, but it makes a noticeable difference in stability.
Add Outdoor Furniture, Potted Plants, or Decorative Stones for Personalization
Once settled, make the space yours. Position outdoor furniture, arrange potted plants (native Carolina jasmine thrives here), or place decorative stones as accents. These elements transform the functional into the personal.
Some Charlotte homeowners add:
- Solar lighting along pathways
- Weather resistant outdoor rugs
- Potted ferns that thrive in partial shade
- Fire pits (perfect for those cool fall evenings)
Maintain by Regularly Raking and Topping Up Gravel as Needed
Like any outdoor space, gravel patios require upkeep. Rake the surface occasionally to redistribute stones and maintain evenness. Plan to add fresh gravel every couple years, as some inevitably migrates or sinks. The Carolina freeze thaw cycle accelerates this process, particularly in shadier spots.
Worth noting. But don’t let that discourage you. The minimal maintenance is part of the appeal compared to wooden decks that need staining or concrete that cracks.
Maintenance and Longevity Considerations

Importance of Regular Upkeep
Building a gravel patio isn’t like installing a dishwasher and walking away. Mother Nature and your own two feet conspire against it daily. Rain washes away the finer particles. People walking across it push stones aside. Time itself seems determined to ruin your hard work.
Rake Gravel Periodically to Maintain Level Surface and Prevent Displacement
Most Charlotte homeowners don’t realize they should rake their gravel every 3-4 months. This simple task:
- Redistributes stones evenly across thin spots
- Breaks up the beginning of weed growth
- Prevents “channels” from forming where water might run
- Keeps the surface looking intentional, not neglected
The best time? After a light rain when the gravel isn’t dusty but isn’t soaking wet either. Use a metal rake with widely spaced tines, not your leaf rake.
Replenish Gravel Layers to Compensate for Settling or Loss Over Time
Charlotte’s clay soil means more settling than in other regions. Every 2-3 years, you’ll need to add about 1-2 inches of new gravel. The cost isn’t huge (about $3-5 per square foot), but the visual impact is immediate.
Areas near downspouts or in the path from your back door to the grill need the most attention. The original gravel doesn’t vanish – it just sinks gradually into the soil beneath.
Benefits of Proper Edging and Sub-Base
The difference between a five-year patio and a fifteen-year patio often comes down to what you can’t see after it’s built.
Edging Prevents Gravel Migration, Reducing Cleanup and Maintenance
Without proper edging, Charlotte’s summer thunderstorms will redistribute your gravel across the yard. Good edging options include:
- Pressure-treated lumber (lasts 7-10 years)
- Metal edging (nearly invisible, lasts 15+ years)
- Stone or brick (most expensive, but permanent)
- Plastic edging (affordable but might heave during freeze/thaw cycles)
The edging should extend at least 2 inches below the gravel and rise 1 inch above it. This creates a contained system that keeps your investment where it belongs.
A Well-Compacted Sub-Base Enhances Drainage and Structural Stability
Charlotte gets about 43 inches of rain annually, much of it in sudden downpours. A proper sub-base means the difference between a muddy mess and a functional patio.
The sub-base should be:
- At least 4 inches deep
- Compacted in 2-inch layers
- Sloped away from your home (about ¼ inch per foot)
- Made of crushed stone, not rounded pebbles
This foundation might seem excessive when you’re building, but you’ll appreciate it during those August thunderstorms when your neighbor’s patio turns into a wading pool.
Practical Advice for Charlotte Homeowners
In Charlotte, the kind of soil and climate can change how well a gravel patio works. The clay-rich soil here can hold onto water, so drainage is key. Setting up a solid sub-base and using a weed barrier goes a long way.
Also, think about the colors of your gravel. Choosing shades that match the natural landscape, like warm earth tones or soft grays; this can help blend your patio into the rest of your yard. Remember the exposure to sunlight too; gravel patios in shaded areas might need more work to stop moss or algae from growing.
For anyone new to DIY projects, starting with a smaller patio is a smart way to learn. It helps you get the hang of the process before moving on to bigger projects. Renting a plate compactor and using the right tools can make a notable difference in how your patio turns out.
FAQ
What are the basic gravel patio installation steps?
Setting up a gravel patio is simpler than you might think. Start by measuring and marking your area, then remove existing grass and soil. For gravel patio base preparation, dig down 6-8 inches. Add landscape fabric under gravel to prevent weed growth, then add a base layer of crushed stone.
Next comes your main gravel layer. Level the surface carefully, ensuring proper drainage. Many DIY gravel patio projects can be completed in a weekend with basic tools.
What’s the best gravel for patio use and what thickness should I aim for?
The best gravel for patio surfaces depends on your needs. Pea gravel patio material offers a smooth, rounded texture that’s comfortable underfoot. Crushed stone patio bases provide better stability. For patio gravel depth, use 4-6 inches of base material topped with 2-3 inches of finishing gravel.
The total gravel patio thickness should be about 6-8 inches for durability and proper drainage.
How do I handle gravel patio drainage solutions for different yard types?
Proper gravel patio drainage prevents water pooling and extends patio longevity. For a gravel patio for sloped yard settings, work with the natural slope, ensuring water flows away from buildings. For gravel patio for flat yard situations, create a slight grade (about 1″ drop per 8 feet) during installation.
Using larger gravel for the base helps with water flow. In problem areas, consider installing drain pipes beneath your gravel patio underlayment.
What are the gravel patio pros and cons compared to other materials?
When weighing gravel patio vs pavers, consider these factors: Gravel is more affordable and easier to install. A low maintenance gravel patio requires occasional raking and weed removal. However, gravel can scatter and may need occasional replenishing. Unlike pavers, gravel creates a permeable surface for eco-friendly gravel patio drainage.
Gravel patio durability is excellent with proper installation, though expect to add fresh gravel every few years to maintain appearance.
What are some creative gravel patio design ideas?
For modern gravel patio aesthetics, consider contrasting gravel colors with sleek furniture. Rustic gravel patio designs work well with natural stone borders and wooden elements. For backyard gravel patio inspiration, mix different gravel patio color options or include a gravel patio with stepping stones for visual interest.
A gravel patio with seating area can define spaces in larger yards. Gravel patio with lights creates dramatic evening ambiance for entertaining.
How should I prepare the foundation for my gravel patio?
Starting with proper gravel patio foundation is crucial. Remove topsoil and vegetation completely. For the gravel patio base layer, use 3-4 inches of crushed stone or gravel (3/4″ size works well). Some installations benefit from sand under gravel patio areas for better leveling.
When compacting gravel patio layers, use a plate compactor between each layer. Proper preparation prevents common gravel patio mistakes to avoid like sinking and uneven surfaces.
What options exist for patio edging for gravel containment?
Gravel patio borders are essential for keeping material in place. Gravel patio edging options include metal strips, pressure-treated lumber, natural stone, or brick. For a gravel patio with retaining wall, ensure the wall is installed before the gravel for structural integrity.
Edging helps define your space while reducing maintenance. For gravel patio walkway connections, continue the edging along paths for visual continuity.
How much does a gravel patio cost compared to other options?
An affordable gravel patio is one of the most budget-friendly hardscaping options. Typical gravel patio cost runs $5-10 per square foot installed professionally, while DIY installation costs $2-5 per square foot. Small gravel patio areas (10’x10′) might cost $250-500 in materials.
Large gravel patio spaces naturally cost more but remain cheaper than pavers or concrete. The most significant expenses are quality gravel and equipment rental for compacting.
How do I maintain my gravel patio over time?
Gravel patio maintenance is straightforward but regular. Rake the surface monthly to keep it level. Use a leaf blower for gravel patio cleaning without displacing stones. For weed control, install weed barrier for gravel patio during construction and apply pre-emergent herbicide seasonally. Gravel patio repair usually involves adding new material to low spots. For gravel patio upgrades, consider adding decorative elements like pottery or outdoor art.
How can I create different styles for my gravel patio?
For gravel patio for small spaces, use lighter colored gravel to make areas feel larger. Gravel patio for large spaces can incorporate multiple zones. A gravel patio for entertaining might include a gravel patio with pergola for shade. A gravel patio with water feature creates a relaxing focal point. For gravel patio for outdoor dining, ensure the surface is level enough for stable furniture. Add gravel patio with plants around edges for a softer look.
What should I consider for gravel patio furniture selection?
Choose gravel patio furniture with wider legs or bases to prevent sinking. Adirondack chairs, benches with runners, and tables with broad feet work well. For a gravel patio for relaxation, consider lounge chairs with stable frames. Add furniture pads under legs for additional stability. Heavier pieces tend to stay in place better than lightweight options. For a gravel patio for fire pit area, keep furniture at safe distances and consider flame-resistant materials.
How do I address gravel patio accessibility and safety concerns?
For gravel patio safety, choose smaller, compacted gravel that’s more stable underfoot. Improve gravel patio accessibility by creating firmer pathways using stepping stones or compacted areas. For mobility devices, consider laying a few flat flagstones in key areas. Mark edges clearly to prevent tripping. For evening use, incorporate path lighting along edges and walkways to improve visibility.
How can I make my gravel patio more environmentally friendly?
An eco-friendly gravel patio uses locally sourced materials to reduce transportation impacts. Choose gravel patio landscaping with native plants that require less water. For gravel patio with plants, select drought-resistant varieties. Permeable surfaces help with natural water filtration. Consider recycled glass gravel or reclaimed materials for borders. Avoid chemical weed treatments by using thorough preparation and regular maintenance.
What’s the process for laying gravel for patio areas properly?
Start by marking your area and removing 6-8 inches of soil. When laying gravel for patio spaces, work in layers. First, install landscape fabric, overlapping edges by 6 inches. Add 3-4 inches of coarse gravel, then compact. Add 2-3 inches of medium gravel, compact again. Finish with 1-2 inches of your chosen top gravel. For leveling gravel patio surfaces, use a long straight board and level. Create a slight gravel patio slope away from buildings.
What gravel patio before and after changes can I expect?
Gravel patio before and after transformations are dramatic. Expect to convert unusable yard space into functional outdoor living areas. Fresh installation looks clean and formal, while over time, the patio develops a more settled, natural appearance. Gravel patios weather beautifully, with colors deepening slightly.
Plants around edges will mature, softening boundaries. Most homeowners report increased outdoor usage and enjoyment after completing their gravel patio setup.
Conclusion
Gravel patios offer Charlotte homeowners a budget-friendly outdoor option that works with nearly any backyard style. The process isn’t complicated, just needs proper planning and some weekend effort. Start with a solid foundation, install sturdy borders, and select appropriate gravel (3/8″ works best in our Carolina climate).
The finished space requires minimal upkeep, just occasional raking and weed prevention. For about half the cost of concrete, you’ll create a functional gathering space that handles our humid summers and mild winters without cracking or fading.
Ready to transform your backyard? Install a gravel patio with help from local experts who know what works best in Charlotte’s climate.
Related Articles
- https://lapispatios.com/articles/gravel-patios/
- https://lapispatios.com/articles/concrete-patio-installation-guide/
- https://lapispatios.com/articles/gravel-patio-design-ideas/
References
- https://www.thespruce.com/gravel-patio-how-to-4174020
- https://decorativeaggregates.com/blogs/how-to-guides/simple-guide-to-laying-a-gravel-garden-patio