See how lighting for outdoor sculptures turns every piece into a striking focal point that elevates your space and creates unforgettable ambiance.
Lighting outdoor sculptures is more than just making them visible at night. It’s about letting the artwork come alive under the night sky. In cities like Charlotte, where art meets nature, the right lighting can turn a simple sculpture into a powerful, immersive experience.
Light reveals details hidden in daylight, textures, curves, and shadows that tell a deeper story. You don’t need to be a professional; with some smart choices, anyone can highlight outdoor pieces beautifully.
Wondering how to make your sculptures stand out after dark? Keep reading to learn the key techniques.
Key Takeaway
- Good lighting highlights the shape and texture of sculptures, making the space feel welcoming.
- Choosing the right fixtures and color temperatures is key to showing off different materials in outdoor art.
- Testing and adjusting your setup improves how the sculptures fit with their surroundings.
Understanding the Basics of Outdoor Sculpture Lighting
Lighting plays a big role in how we see outdoor sculptures. It’s not just about making them visible; it’s about bringing out their true character.
A well-planned lighting setup draws attention to unique features, creating a dramatic mix of light and shadow that brings the sculpture to life. Especially in Charlotte, where city and nature blend, thinking about style is even more important.
When picking lighting, consider how it works with the sculpture’s materials and design. Good lighting highlights textures and sets a mood that fits the place. This approach makes the sculpture more interesting and helps it blend naturally with its surroundings.
Key Lighting Techniques for Sculptures
Different lighting methods serve different purposes, each with its own benefits.
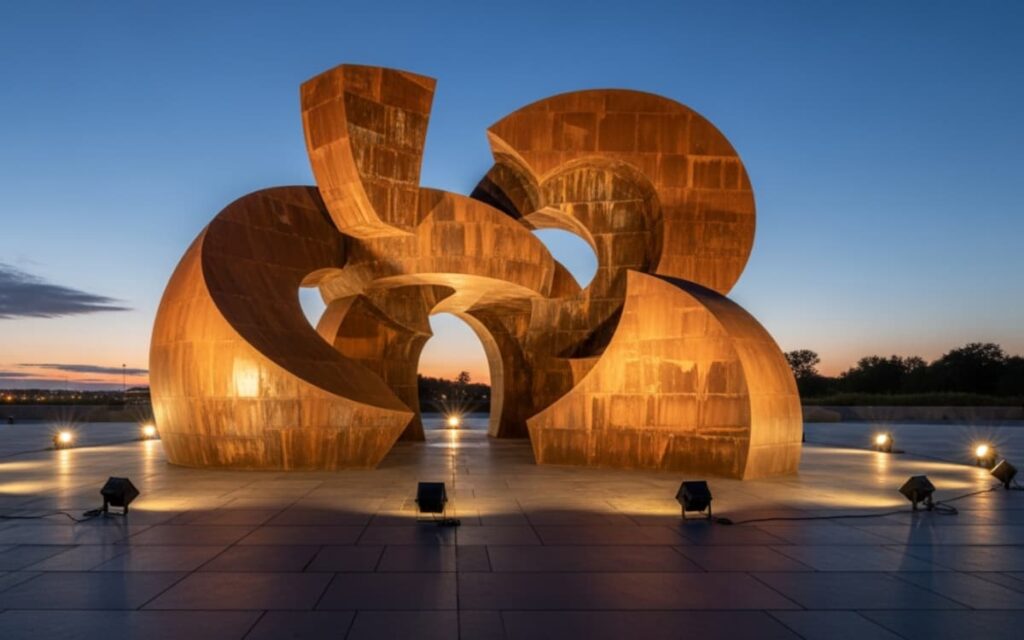
Uplighting: Adding Drama and Depth
Uplighting can turn a flat sculpture into something bold. Lights placed at the base shine upward, emphasizing height and shape, and casting long shadows that add depth.
Positioning and Spacing:
The distance between lights and the sculpture, and the spacing of multiple fixtures, should depend on the sculpture’s size, shape, the beam angle of the luminaires, and the desired effect.
Instead of fixed rules, plan your setup, then test with your actual fixtures to find the right distance and spacing for even, flattering the lighting.
For example, a tall bronze statue benefits from uplighting to show off its size and texture, while a smaller stone sculpture looks best with light focused near its base.
Spotlighting: Focusing on Details
Spotlights are precise. They highlight fine details, drawing your eye to special parts of the sculpture.
- Beam Focus: Use narrow beams to bring out delicate curves or surface textures.
- Best For: Sculptures with intricate designs where details might be missed under broader lighting.
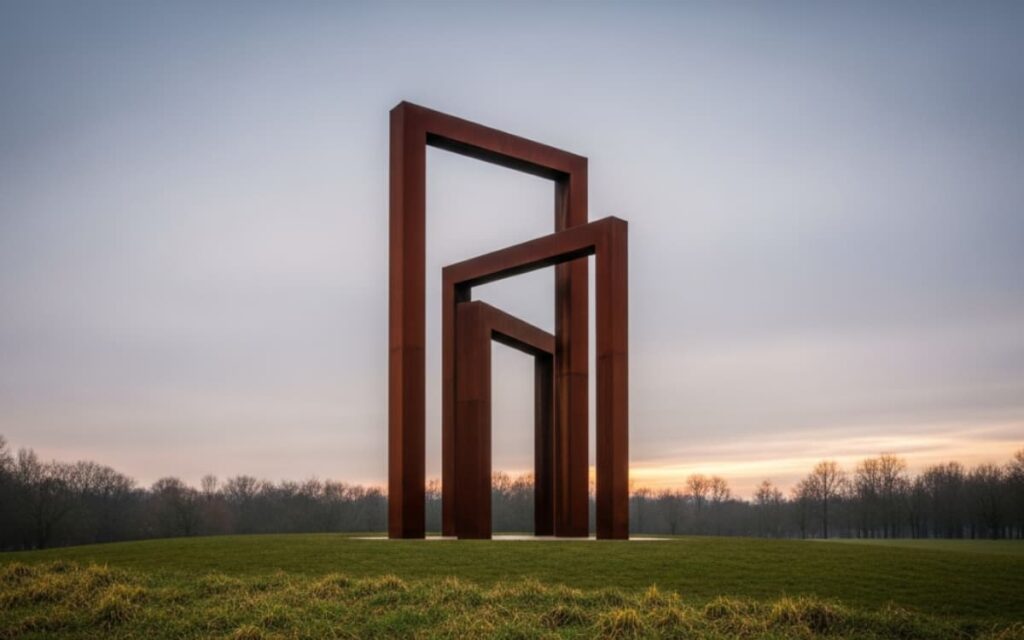
Floodlighting: Covering Larger Pieces
Floodlighting can be useful for large sculptures or works displayed where viewers circle around them. But used alone, floodlighting may flatten textures and minimise depth.
For best results, combine floodlighting with accent or spotlighting so that surfaces, contours, and details retain their three-dimensional character.
- Even Coverage: Well-placed floodlights make large sculptures easy to see from many angles.
- When to Use: Ideal for pieces people can walk around, needing consistent light all around.
Recessed and Well Lights: Gentle Ground-Level Glow
Recessed lights add a soft glow without stealing attention.
Integrating professional patio lighting at ground level blends the sculpture into its surroundings while keeping it visible.
These fixtures should be set and angled to cast a warm, inviting light that enhances the art without overpowering it.
Choosing the Right Lighting Fixtures
Not all lights are the same. Choosing fixtures that enhance sculptures while lasting outdoors is important.
LED Lights: Efficient and Long-Lasting
LEDs save energy and last longer than traditional bulbs. They also stay cool, so they won’t damage the artwork.
Color Temperature: Matching Light to Material
| Sculpture Material | Recommended Color Temperature | Best Lighting Technique | Visual Effect Achieved |
| Bronze | Warm white (2700–3000K) | Uplighting, grazing | Enhances patina, adds depth and shadow |
| Stone (light) | Neutral to cool white (3500–4000K) | Soft wash, side lighting | Preserves natural color, reveals texture |
| Stone (dark) | Neutral white (3000–3500K) | Grazing near base | Emphasizes surface detail and form |
| Modern / Abstract | Adjustable (RGB or tunable white) | Accent lighting, contrast lighting | Creates drama, mood, and visual interest |
The color of the light changes how a sculpture looks.
Warm White Light (≈2700-3000K)
Often flatters warm-tone materials such as bronze or certain earthy stones, helping bring out their warmth and natural character.
That said, depending on the stone’s hue, texture, and surrounding environment, a neutral white (≈3500-4000K) or slightly cooler light may also work well. It’s best to test different color temperatures in your space before deciding.
Cool White for Light Stones
Highlights the subtle shades in lighter materials, making them stand out against dark backgrounds.
Placement and Spacing: Fit to Size and Location
Where you position your fixtures matters just as much as which ones you buy. The distance between the light and the sculpture completely changes the effect.
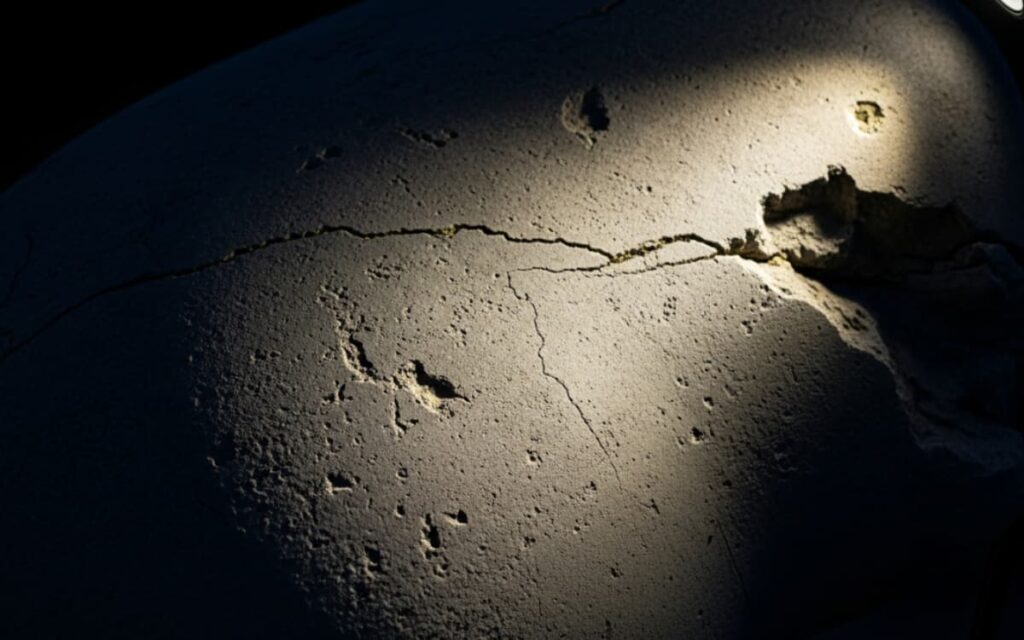
For Texture (Grazing)
If you want to show off the rough surface of stone or the carving details, place the light very close to the base, usually 1 to 2 feet away. Point the beam straight up. This creates dramatic shadows that make the texture pop.
For the Big Picture (Washing)
To see the whole shape of the sculpture comfortably, move the light back. For a typical garden statue (3 to 6 feet tall), placing the light 5 to 8 feet away usually works best. This highlights the form without creating harsh shadows.
For Large Statues
You generally only need to place lights 10 to 20 feet back if you are lighting a massive, monument-sized piece. For most home gardens, keeping the light closer prevents the beam from spilling into your neighbor’s yard.
Adjusting for Effect
Even moving a fixture just a few inches can fix a glare or fill in a dark spot. Don’t be afraid to experiment.
Design Principles for Effective Sculpture Lighting
Lighting isn’t just about brightness. The way light hits a sculpture shapes what you see and feel.
Showing Textures and Details
Good lighting reveals layers. Flat, even light can make a sculpture look dull. Angled light creates shadows that highlight textures and imperfections, telling a story.
- Avoid Uniform Lighting: Even light flattens the sculpture, making it look two-dimensional.
- Use Shadows: Shadows add depth and drama, hinting at movement or emotion.
Off-Center Lighting: Bringing Out Form
Lights placed off to the side break up flatness. They highlight curves, edges, and angles, giving the sculpture volume and making it pop.
Ambient Lighting: Blending Sculpture with Surroundings
Ambient light sets the mood without stealing focus.
Utilizing various ambient landscape lighting ideas, such as path or string lights, can softly guide visitors toward the sculpture while supporting the main lighting.
This frames the art and warms the space, making the sculpture feel like a natural part of a bigger scene.
Testing and Adjusting Your Lighting Setup
Setting up lights is just the start. Fine-tuning is where the magic happens.
Why Test at Night?
Daylight can fool you. Light that looks good in the afternoon might feel harsh or weak after dark. Testing at night shows how shadows and colors really appear.
Tweaking Angles and Brightness
Small shifts in light angle change shadows and depth. Brightness matters too, too much light washes out details; too little hides them. Finding balance takes patience.
Using Diffusers to Soften Light
Using diffusers, or fixtures with controlled optics, can help avoid harsh glare. However, overly diffused light can reduce the play of shadows and depth, softening textures so much that the sculpture looks flat. Use diffusion judiciously and think carefully about fixture beam spread and beam control.
Pro Tip: Look at other light sources nearby. Sometimes adjusting those can improve how your sculpture looks more than changing your own setup.
Lighting Different Sculpture Types: Examples
Different materials respond best to different lighting.
Bronze: Warm Light and Uplighting
Bronze responds best to warmth and direction. Warm light enhances the metal’s natural patina, revealing deep browns, muted golds, and subtle green oxidation. Cooler light often flattens these tones and makes the surface look lifeless.
Uplighting is especially effective because it creates shadow and contrast, which emphasizes texture, curves, and fine details formed by casting or sculpting.
Lighting guidance for bronze sculptures often notes that ‘warm light enhances materials such as bronze and accentuates underlying hues’, a principle widely referenced in museum and heritage lighting practice . [1]
Key considerations for bronze lighting:
- Use warm white light between 2700K and 3000K
- Position lights low and angle them upward
- Avoid harsh overhead lighting that removes depth
Stone: Cool Light and Soft Glow
Stone sculptures benefit from restraint. Cool or neutral light preserves the natural color of materials like marble, granite, and limestone without introducing yellow or muddy tones.
The goal is clarity, not drama. Soft, diffused lighting allows the eye to notice surface details such as chisel marks, grain, and erosion patterns without overpowering the form.
Even illumination works better than a single strong beam. When light wraps gently around the sculpture, shadows appear softer and more natural.
This approach helps stone feel grounded and calm within its environment. Lighting professionals consistently emphasize that material-sensitive lighting improves authenticity and viewer perception, particularly for stone-based artwork.
Modern Art: Play with Color and Brightness
Modern and contemporary sculptures invite experimentation. These works often treat light as part of the artwork rather than a supporting element. Brightness, color, and contrast can all be used to shape how the piece is experienced at night. Adjustable lighting allows the sculpture to shift mood depending on setting, season, or event.
In contemporary practice, ‘light itself has become a primary sculptural medium’, meaning illumination can alter interpretation and emotional impact rather than simply improve visibility [2]
Effective lighting approaches for modern art:
- Use color-changing or RGB fixtures
- Vary brightness levels to create contrast
- Treat light as an extension of the sculpture’s form
Fitting Lighting into Charlotte’s Setting
Lighting in Charlotte requires a little extra thought because of our specific climate and environment. It isn’t just about style; it’s about working with the elements.
Navigating the Tree Canopy
Charlotte is famous for its massive willow oaks and dense tree canopy. When lighting a sculpture, look up. Ensure hanging branches won’t block your light beam.
Alternatively, you can use the trees to your advantage by mounting downlights in the branches to create a “moonlight” effect that washes over the sculpture from above.
Managing Humidity and Glare
Our summers can get incredibly humid. Heavy moisture in the air can scatter light, creating a hazy “halo.” When planning patio lighting for outdoor spaces, use fixtures with “shrouds” to keep the light focused on the art.
Avoid aiming beams where they might shine into the eyes of guests, as humidity makes glare feel even brighter.
Respecting Dark Sky Guidelines
Many neighborhoods in the Charlotte area are adopting “Dark Sky” principles to reduce light pollution. This means you should avoid shooting light straight up into the sky if the sculpture doesn’t block it.
- Try to angle lights so the beam lands entirely on the sculpture.
- Use softer brightness levels. You rarely need high-wattage blasts to make art look good in a dark garden; a subtle glow is often more elegant and keeps the neighbors happy.
Why Lighting Completes Outdoor Sculptures
Lighting outdoor sculptures is more than practical, it’s part of the art itself. By choosing the right techniques, tools, and respecting local style, you can turn any sculpture into a nighttime highlight that draws attention and admiration.
Next time you’re outside after dark, think about how light can reveal the hidden beauty of your sculptures, inviting you to see them in a new way.
If you want expert help bringing that vision to life, Lapis Patios can design and install lighting that fits your space and your art.
References
- https://museumsandheritage.com/advisor/posts/lighting-life-art-lighting-sculpture/
- https://www.composition.gallery/journal/light-art-illumination-as-a-sculptural-medium/