A gravel patio offers an easy, cost-effective way to enhance outdoor living. Learn how to install, design, and maintain one effortlessly.
A gravel patio is a durable, low-maintenance outdoor surface that offers excellent drainage and a natural look. Unlike concrete or pavers, it resists cracking, requires minimal upkeep, and blends with various design styles.
It’s an affordable option, costing as little as $1–$3 per square foot, and can be installed as a DIY project. Gravel patios work well for seating areas, fire pits, and garden spaces, providing a versatile foundation for outdoor living.
With proper edging and occasional raking, they remain tidy and long-lasting. Ideal for both modern and rustic settings, a gravel patio enhances functionality and aesthetic appeal.
Key Takeaways
- Effortless Maintenance: Occasional raking and weed control keep it looking fresh.
- Cost-Effective & DIY-Friendly: Simple installation with minimal materials and tools.
- Versatile & Stylish: Complements any landscape design with various gravel types and edging options.
Benefits of a Low-Maintenance Gravel Patio
Credits: Bunny Guinness
A gravel patio is one of the easiest ways to create a functional outdoor space without the hassle of constant upkeep. Unlike concrete, which cracks, or wood, which requires sealing, gravel stays put with minimal effort. It’s a budget-friendly, durable choice that looks great in almost any setting.
Minimal Upkeep
Gravel patios require far less maintenance than wood or concrete.
- No sealing or staining: Unlike wood decks, gravel doesn’t need protective coatings.
- Weed prevention: A fabric barrier under the gravel blocks most weeds. Occasional spot treatment helps keep it clear.
- Quick fixes: If the surface becomes uneven, a simple rake-through levels it out.
Regular upkeep is as easy as pulling the occasional weed and redistributing gravel when needed—no expensive treatments or major repairs.
Superior Drainage
Gravel allows water to seep through, preventing common drainage problems.
- No standing water: Rain quickly drains instead of pooling.
- Prevents runoff: Ideal for sloped yards where water flow needs control.
- Less erosion: Unlike solid surfaces, gravel absorbs water, reducing soil displacement.
This makes gravel patios a smart choice for areas prone to heavy rain or fluctuating temperatures.
Cost-Effective
A gravel patio delivers great value for the price.
- Affordable materials: Gravel costs $1–$3 per square foot, much cheaper than pavers ($6–$12 per square foot).
- DIY-friendly: Installing gravel is simple, saving thousands on labor.
- Long lifespan: While some gravel may need replenishing over time, it lasts for decades without major repairs.
For homeowners wanting a durable, stylish patio without a huge investment, gravel is the way to go.
Versatile Aesthetic
Gravel patios blend seamlessly with different styles.
- Color choices: Available in natural shades like gray, tan, and white.
- Works with any design: Complements rustic, modern, or traditional landscapes.
- Flexible layouts: Use gravel alone or pair it with pavers or stepping stones.
This adaptability makes it easy to create a patio that matches the home’s exterior. (1)
Eco-Friendly
Gravel is one of the most sustainable patio materials.
- Recycled options: Crushed concrete or repurposed stone reduces waste.
- Permeable surface: Helps rainwater soak into the ground instead of causing runoff.
- Low environmental impact: Producing gravel requires far less energy than concrete or brick.
For those looking to create an environmentally conscious outdoor space, gravel is a smart, sustainable choice.
Choosing the Right Gravel for Your Patio
Not all gravel is the same. The type you choose affects everything from comfort to durability. Some varieties compact well and stay in place, while others shift easily and work better for decoration. The right choice depends on how you plan to use the patio and what kind of look you want.
Pea Gravel
Pea gravel consists of small, smooth stones, usually about ¼ to ⅜ of an inch in diameter. It feels soft underfoot, making it a great choice for lounging areas and walkways. However, because the stones are round, they don’t lock together well.
This means they tend to shift when walked on or when furniture is placed on them. If using pea gravel for a patio, consider adding edging to keep it contained. It also requires occasional raking to maintain an even surface.
Crushed Stone
Crushed stone is a popular choice for patios because of its stability. Unlike pea gravel, it has jagged edges that help the pieces interlock, reducing movement underfoot. It ranges in size from dust-like particles to about ¾ of an inch, making it a versatile option for different patio designs.
Because it compacts well, it’s ideal for areas with heavy foot traffic or patio furniture. Crushed stone also comes in various colors, allowing homeowners to match it to their outdoor aesthetic.
Decomposed Granite
Decomposed granite is a fine material that compacts into a firm surface, making it one of the best options for high-traffic areas. It creates a more solid patio than loose gravel while still allowing water to drain through.
For added durability, it can be mixed with a stabilizer that hardens it slightly, reducing erosion and shifting over time. This makes it a good alternative to traditional pavers or concrete for a natural-looking yet functional patio. However, it does require occasional replenishing as it wears down over the years.
River Rock
River rock consists of larger, rounded stones that are mostly used for decorative purposes. These smooth, polished stones add visual interest to a patio but are not ideal as a primary surface. Since they don’t compact well, they shift too much underfoot, making walking or placing furniture difficult.
Instead, river rock works best as an accent material, such as bordering a patio, lining garden beds, or filling drainage areas. It also pairs well with other gravel types to create a layered design.
Essential Steps for Gravel Patio Installation
A gravel patio is a straightforward weekend project, but taking shortcuts can lead to problems down the road. (2)
Sinking, shifting, and weeds popping through are all common issues that happen when key steps are skipped. By following a proper installation process, you’ll ensure a stable, long-lasting patio that looks great and requires minimal upkeep.
Mark & Excavate
The first step is to define the patio space. Use stakes and string to outline the shape, making sure it’s large enough for furniture and foot traffic. Once marked, dig out the area about 5–6 inches deep. This depth allows room for a sturdy base layer and the decorative gravel on top.
Remove any roots, rocks, or debris to create a smooth, even surface. If the ground is uneven, use a level to check the slope, ensuring the patio will drain properly when it rains.
Install Base Layer
A solid foundation is key to preventing the patio from shifting over time. Spread a 3–4 inch layer of crushed stone or gravel, then compact it using a plate compactor. This step helps stabilize the surface and provides good drainage.
Renting a compactor from a hardware store makes the job easier, but a hand tamper can work for smaller areas. Skipping this step leads to uneven surfaces and pooling water, so it’s worth taking the extra time to do it right.
Lay Weed Barrier
To prevent weeds from growing through the gravel, lay down a layer of landscape fabric over the compacted base. This allows water to drain while keeping unwanted plants at bay. Avoid using plastic sheeting, which can trap water and create drainage issues.
Overlap fabric pieces by at least six inches and secure the edges with landscape staples to keep it from shifting. This barrier won’t stop all weeds forever, but it significantly reduces the amount of maintenance needed.
Spread Decorative Gravel
Now it’s time to add the top layer. Choose a gravel type that suits your design, such as pea gravel, crushed stone, or decomposed granite.
Spread it about 1–2 inches deep, making sure it’s even across the entire surface. Use a rake to level it out, and walk over the patio to help the gravel settle into place. If you want a firmer surface, you can lightly compact it, but leaving it loose gives a softer, more natural feel.
Add Edging
Edging is essential for keeping gravel contained and preventing it from spreading into the yard. Common edging options include bricks, metal strips, wooden boards, or concrete pavers. Buried edging tends to hold up best over time, as it prevents gravel from escaping while maintaining a clean border.
If you’re looking for a rustic touch, large stones or logs can also work as natural-looking barriers. Once the edging is in place, give the patio a final rake to smooth everything out, and it’s ready to use.
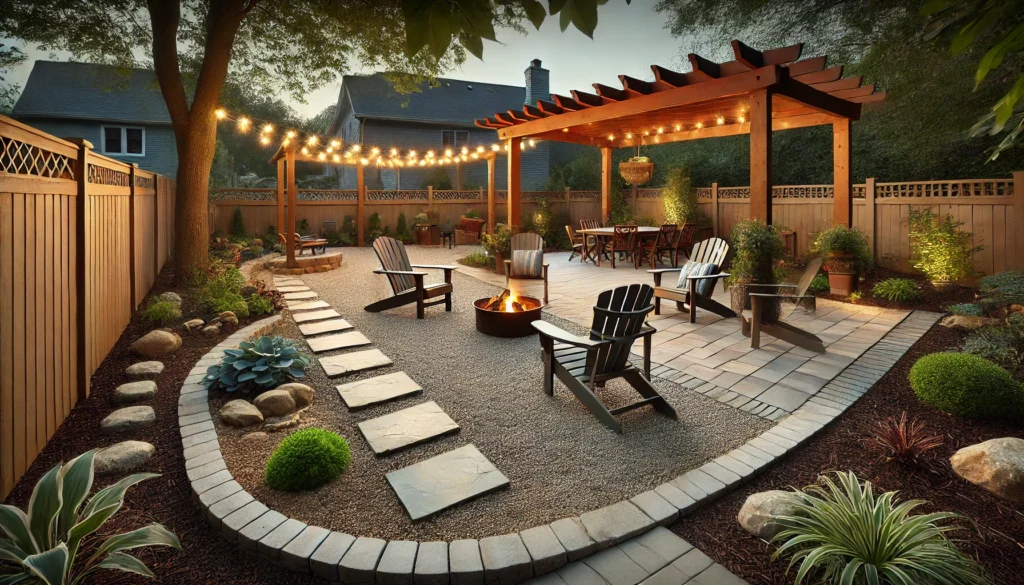
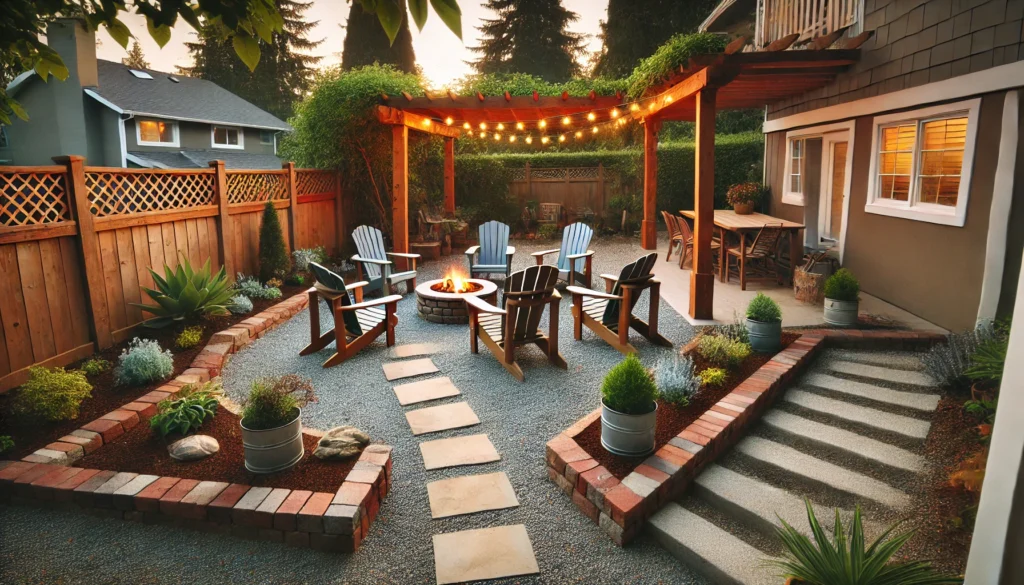
Key Design Elements for a Functional Patio
A well-designed gravel patio isn’t just a space—it’s an extension of your home. The right layout, features, and materials make it both beautiful and practical.
Size & Shape
The shape of your patio affects its function. Round patios feel inviting and cozy, while rectangular layouts work best for structured seating.
- Fire pit areas: Circular patios create a natural gathering space.
- Dining and lounge spaces: Rectangular designs fit tables and chairs better.
- Minimum space needed: At least 10′ x 10′ for seating, 12′ x 12′ for dining.
Going too small makes the patio feel cramped, while oversized layouts can look empty without enough furniture or decor.
Outdoor Features
Adding features helps define the patio and make it more comfortable.
- Fire pits: Gravel won’t scorch or crack like concrete.
- Pergolas: Provide shade and structure.
- Garden beds: Soften the space with plants.
Choosing the right features depends on how you use your patio. Fire pits are great for socializing, while pergolas offer shade for daytime lounging.
Furniture & Layout
Furniture should match both the style and function of your patio. The type of gravel used affects furniture stability.
- Heavy furniture: Crushed stone prevents shifting.
- Light furniture: Pea gravel is more comfortable underfoot.
- Outdoor rugs: Add softness and help define spaces.
If furniture wobbles, placing pavers under legs helps create a level surface.
Landscaping Integration
Blending the patio with the surrounding landscape makes it feel natural.
- Stepping stones: Create walkways to connect spaces.
- Boulders: Add texture and a sense of permanence.
- Native plants: Complement gravel with greenery.
Mixing natural materials keeps the patio from feeling too stark or unfinished.
Lighting & Ambiance
The right lighting transforms a basic patio into an inviting outdoor retreat.
- Solar lights: Line pathways for safety.
- String lights: Add warmth and charm.
- Lanterns or fire pits: Provide extra glow at night.
A mix of lighting styles ensures the patio stays usable long after sunset. Cozy lighting makes even a simple gravel patio feel special.
Maintenance Tips to Keep Your Gravel Patio Looking Great
A gravel patio is low-maintenance, but that doesn’t mean it takes care of itself. With a few simple habits, you can keep it looking fresh, level, and weed-free for years.
Raking & Leveling
Gravel shifts over time, especially in high-traffic areas or after heavy rain. Regular raking helps keep the surface even and prevents dips from forming.
- Use a bow rake or landscape rake to spread gravel evenly.
- Pay extra attention to spots where chairs, tables, or feet leave depressions.
- After storms, smooth out any displaced gravel to avoid puddles.
A well-raked patio looks better and lasts longer. Without raking, gravel can clump or shift, making walking uncomfortable.
Weed Prevention
Even with a weed barrier, some weeds find a way through. Staying on top of them prevents a bigger problem later.
- Pull weeds early, before they spread roots.
- Use natural treatments like vinegar or boiling water for spot control.
- Apply a pre-emergent herbicide once a year if weeds are persistent.
Consistent maintenance makes weed removal quick and easy. Ignoring them for too long leads to a messy, overgrown look.
Gravel Replenishment
Over time, gravel naturally washes away, compacts, or gets lost in the soil. Adding fresh gravel helps maintain depth and appearance.
- Top off with a thin layer of new gravel every 1–2 years.
- Stockpile extra gravel from the initial installation for a perfect match.
- Avoid overfilling—too much gravel makes walking unstable.
By refreshing the surface occasionally, you’ll keep your patio looking new without needing a full replacement.
Drainage Management
Poor drainage leads to pooling, mud, and erosion. Keeping the patio dry prevents long-term issues.
- Check for puddles after heavy rain—these indicate low spots.
- If needed, adjust gravel depth or add crushed stone for better drainage.
- Ensure the patio has a 1–2% slope away from structures to prevent water buildup.
A well-draining patio stays cleaner and requires less maintenance throughout the year.
Seasonal Care
Different seasons bring different challenges. A little preparation keeps your gravel patio in top shape year-round.
- Winter: Avoid using salt—it damages gravel. Use sand for traction instead.
- Spring: Rake out debris and refresh the gravel layer.
- Fall: Clear leaves regularly to prevent mold and staining.
Taking care of small tasks each season keeps the patio looking great without major repairs. Regular maintenance saves time and money in the long run.
Common Mistakes & How to Avoid Them
Building a gravel patio seems simple, but skipping key steps can lead to frustration. Poor planning results in shifting gravel, drainage issues, and uneven surfaces. Here’s what to watch out for and how to fix it.
Skipping the Base Layer
A strong foundation is essential. Without it, the patio may sink, shift, or become uneven over time. Many DIYers pour gravel directly onto soil, which leads to poor stability.
- Always start with a base layer of crushed stone or coarse gravel.
- Compact the base with a plate compactor or hand tamper to prevent shifting.
- Aim for a 2-4 inch base layer before adding decorative gravel.
A well-prepared base keeps the patio level and reduces maintenance. Without it, gravel will sink into the ground, creating uneven spots.
Choosing the Wrong Gravel Type
Not all gravel works well for patios. Some choices lead to discomfort, poor stability, or constant shifting.
- Large, jagged rocks are rough underfoot and hard to walk on.
- Smooth, round stones (like river rock) move too much under furniture.
- Pea gravel is comfortable but shifts easily unless contained.
- Crushed stone or decomposed granite compacts better, making a more stable surface.
Picking the right material ensures the patio is comfortable and functional for everyday use.
Ignoring Drainage Needs
Without proper drainage, water pools on the patio, leading to muddy spots, erosion, and even damage to nearby structures.
- Always slope the patio slightly away from the house (about 1/8 inch per foot).
- Use a permeable base like crushed stone to help water drain.
- For heavy rain areas, consider adding a French drain or extra drainage channels.
A properly drained patio stays dry and lasts longer without issues.
Forgetting to Install Edging
Without edging, gravel spreads into the yard, making a mess and reducing the patio’s shape.
- Use metal, brick, or stone edging to keep gravel in place.
- Bury edging slightly so it stays secure over time.
- Wooden edging can work, but it may rot if not treated properly.
A solid border keeps the patio looking neat and prevents constant raking to contain the gravel.
Neglecting Long-Term Maintenance
Gravel patios need occasional upkeep. Over time, gravel settles, compacts, and shifts, leading to uneven spots.
- Rake the gravel every few weeks to keep it level.
- Add fresh gravel every 1-2 years to maintain depth.
- Remove weeds with a weed barrier or occasional spot treatments.
A little maintenance goes a long way in keeping the patio looking fresh and functional. Planning ahead and avoiding these mistakes will ensure a stable, long-lasting gravel patio.
Budget & Cost Considerations
A gravel patio is one of the most affordable ways to create an outdoor living space, but costs can add up depending on the materials, size, and whether it’s a DIY project or professionally installed. Here’s a breakdown of what to expect.
Material Costs
Different types of gravel come at different price points. Pea gravel is one of the cheapest options, usually costing between $1 and $3 per square foot. Crushed stone is slightly more expensive, at $2 to $5 per square foot, because it compacts better and provides a firmer surface. Decomposed granite, a finer, more compactable material, ranges from $3 to $7 per square foot.
Other materials, like edging, weed barriers, and base layers, add to the total. A basic plastic or metal edging can cost $1 to $3 per linear foot, while higher-end stone or brick edging might cost $10 to $20 per linear foot. These choices affect both the final look and durability of the patio.
DIY vs. Professional Installation
Building a gravel patio yourself saves money but requires some effort. A 200-square-foot DIY patio costs about $500 to $1,000, covering materials like gravel, edging, and a base layer. Renting a plate compactor for better stability adds $50 to $100 to the cost.
Professional installation, while more expensive, ensures a level, well-drained surface. Hiring a contractor for a 200-square-foot patio typically costs $2,000 to $4,000, depending on labor rates and material choices. Larger patios, intricate designs, or high-end materials will push costs higher.
Long-Term Savings
Unlike concrete or wood, a gravel patio requires minimal maintenance and no expensive repairs. There’s no need for sealing, resurfacing, or repainting like with a concrete slab. Wood decks often need staining or sealing and can rot over time, while gravel stays functional with occasional raking.
While gravel shifts over time, maintenance costs are low. Instead of full replacements, occasional top-ups—adding a fresh layer of gravel every few years—keep the patio looking good. This makes gravel one of the most cost-effective patio materials in the long run.
Cost Breakdown by Square Footage
Patio costs scale with size. A 100-square-foot DIY gravel patio can range from $100 to $500, depending on material choice. A professional installation for the same size will likely exceed $1,000.
For a 200-square-foot space, DIY costs rise to $500 to $1,000, while a professional build costs $2,000 or more. Larger patios, like a 500-square-foot setup, can cost $1,000+ DIY or $5,000+ professionally. These numbers vary based on gravel type, edging materials, and additional features like fire pits or pathways.
Budget-Friendly Enhancements
There are ways to save money while making a gravel patio look great. Using recycled gravel from construction sites or repurposed stone can cut costs. Some home improvement stores sell discounted bulk gravel, which lowers material expenses.
For edging, reclaimed bricks, logs, or leftover pavers from other projects can replace costly store-bought options. Instead of fully covering the patio in gravel, using stepping stones or concrete pavers in key areas reduces the amount of gravel needed while improving stability for furniture.
With careful planning, a gravel patio can be both stylish and affordable, offering a durable outdoor space without the high cost of other materials.
Unique Design Ideas to Stand Out
A gravel patio doesn’t have to be just a flat space with a few chairs. With the right design choices, it can be a standout feature in any backyard. From mixing materials to adding luxury elements, here’s how to create a one-of-a-kind outdoor space.
Blended Materials
Using multiple materials can make a gravel patio feel more polished. Pavers, stepping stones, or even bricks can create pathways, borders, or sitting areas. Large stone slabs placed among the gravel add texture and function, making it easier to walk without shifting stones underfoot.
Wood elements, like decking or built-in benches, also blend well with gravel. A wood platform next to a gravel section can define different areas for dining or relaxing. Even repurposed railroad ties or weathered bricks can bring character while keeping gravel contained. Mixing materials helps create contrast, structure, and visual appeal.
Layered Landscaping
Gravel works well with other natural materials, and layering can give a patio more depth. Instead of a flat surface, small retaining walls or raised garden beds can add dimension. Using different levels, like a sunken seating area or elevated planters, makes the space more dynamic.
Mulch, sand, or decorative stone can add contrast when placed next to gravel. Plants help soften the look—low-growing greenery like creeping thyme can even grow between stones. Tall grasses, shrubs, or flowers around the edges create a cozy feel while blending the patio with the rest of the yard. Layering different textures and heights makes the space feel more intentional.
Modern vs. Rustic Aesthetics
Gravel patios can lean into different styles depending on the materials and colors used. A modern design often includes dark-colored gravel, like black or gray, paired with metal or concrete edging. Straight lines, minimal decor, and sleek furniture keep the space looking clean and contemporary.
Rustic patios, on the other hand, use warm-toned gravel, like golden or light brown, combined with wood and natural stone. A curved border made from stacked rocks or bricks can soften the look. Wooden Adirondack chairs, string lights, and a simple fire pit add to the cozy, lived-in feel. Choosing between modern and rustic elements helps create a patio that complements the home’s overall design.
Cozy Small-Space Layouts
A small patio doesn’t have to feel cramped. Built-in seating, like a curved stone bench or a wooden ledge along a fence, saves space while providing plenty of room to sit. Folding chairs or compact bistro sets work well in tight spaces, keeping the area flexible.
Vertical gardens are a great way to add greenery without taking up floor space. Hanging planters, wall-mounted herb gardens, or even a trellis with climbing plants can make a small patio feel lush. Using lighter-colored gravel can also help the space feel larger and more open. Smart layouts and vertical elements make small gravel patios both functional and stylish.
Luxury Touches
Adding high-end features can make a simple gravel patio feel more like an outdoor retreat. A fire pit—whether built-in or portable—creates a natural gathering spot. Water features, like a small fountain or a pond, bring soothing sounds and movement to the space.
Outdoor furniture also plays a big role. Instead of plastic chairs, cushioned seating or a stylish outdoor sofa makes the area more inviting. Even small details, like decorative lanterns, a pergola for shade, or an outdoor rug, can make a patio feel upscale. Luxury doesn’t have to mean expensive—it’s about choosing elements that create comfort and atmosphere.
Final Thoughts
Gravel patios are simple, effective, and adaptable. They drain well, stay cool, and work in just about any space. Whether it’s a quiet reading nook or a full backyard retreat, a little planning goes a long way. Keep the base solid, the edging secure, and the design suited to your needs.
If you’re ready to transform your outdoor space, Lapis Patios offers expert installation with top-tier craftsmanship in Charlotte, NC, and Lake Wylie, SC.
FAQ
How does a gravel patio hold up in different climates?
Gravel patios handle most climates well, but conditions can affect maintenance. In hot, dry areas, gravel stays cool underfoot and prevents heat buildup.
However, wind can scatter lightweight gravel, so heavier crushed stone works better. In rainy regions, proper drainage is key—without a solid base, water can wash gravel away or create muddy patches.
Freezing temperatures aren’t a problem since gravel won’t crack like concrete, but snow removal takes extra care. A plastic shovel works best, and de-icing salts should be avoided since they can break down certain types of gravel over time.
Will weeds grow through a gravel patio even with a barrier?
A landscape fabric barrier helps, but it doesn’t stop every weed. Over time, dust and debris settle into the gravel, creating a thin layer of soil where weeds can sprout. Windblown seeds also land on the surface and take root.
The best way to keep weeds under control is routine maintenance—rake the gravel often, pull small weeds before they spread, and use natural treatments like vinegar or boiling water instead of harsh chemicals. Adding fresh gravel every few years also helps bury any potential weed growth before it becomes a problem.
How do I keep furniture from sinking into a gravel patio?
Lightweight furniture can wobble or sink into loose gravel, especially with pea gravel or river rock. Crushed stone or decomposed granite provides a more stable surface, making it easier to keep chairs and tables level.
Another option is to place large pavers or a solid base under furniture legs to distribute weight evenly. Outdoor rugs also help by keeping legs from digging in while adding a softer look.
If the patio gets heavy use, compacting the gravel with a roller or adding a binding agent can create a firmer foundation that supports furniture better.
Does a gravel patio attract pests like ants or rodents?
Gravel itself doesn’t attract pests, but gaps between stones can provide shelter for small insects. Ants may nest in loose gravel if it’s not packed tightly, and rodents sometimes burrow underneath if there’s a food source nearby. To prevent this, a compacted base layer helps eliminate easy access.
Keeping the patio clean—removing fallen food, sealing garbage bins, and trimming nearby plants—reduces the chances of pests moving in. If ants become a problem, a mix of diatomaceous earth or soapy water can deter them without harming the surrounding environment.
Can a gravel patio be combined with other materials for a unique look?
Absolutely! Mixing materials creates a more customized patio. A popular approach is combining gravel with pavers, forming a stable walkway while keeping the gravel’s natural feel. Large stone slabs or bricks can serve as accents, adding structure to seating areas.
Wooden decking alongside gravel makes for a warm, inviting contrast. Even different types of gravel—such as a darker border around a lighter center—add visual interest. The key is balance—mixing textures and colors while keeping the overall design cohesive. This allows a gravel patio to match any style, from rustic to modern.
References
- https://www.thespruce.com/gravel-patio-ideas-7376229
- https://www.lowes.com/n/how-to/diy-pea-gravel-patio